
Showing posts with label gardening. Show all posts
Showing posts with label gardening. Show all posts
Wednesday, November 9, 2011
Last Harvest


Friday, October 14, 2011
Sun Dried Tomatoes


Wednesday, October 12, 2011
Bounty

This is a nearly 3/4 full paper box of concord grapes! Can you say jelly? I am always overwhelmed this time of year with the bounty that is coming out of the garden. If my only job where to tend the home, I might me able to handle it all. The truth is, the home is usually last on the list of things to do in a day. As a result, I am going to do with these beauties what I did with them last year. I will clean them all from their vines and freeze them in zippered bags until I actually have the time and inclination to make them into jelly. There is really no need to stress about it now when the tomatoes need me most! This box full gave me about 18lbs of grapes. I have three vines that are about four years old. I am thinking that a) I probably only need one vine and b) I will soon be begging friends to help share in the bounty!
Wednesday, September 14, 2011
Tomato Harvest
There has been a lot of harvesting going on around here. I am happy to say I am not doing all the work! Little Miss can clean and eat an entire tomato plant in less than ten minutes. She is fully aware of where everything eatable is in the garden.

I was admiring what a wonderful job my friend Morgan did of illustrating her tomatoes and decided I should give it a try myself. I used Picnic and was really pleased with how easy it was. Sometimes you just need to put yourself out there and see what you can do! Please take a look at the varieties I chose this year!

Thursday, July 28, 2011
Can You Keep Up?

I water my entire half acre yard with a hose. Nothing automated here. When we have several consecutive days near 100 I cannot keep up and things begin to look a bit stressed around here. I worked at a nursery for a lady who told me that once the plants wilted damage had already been done. Well, I am not sure that I believe that. I cannot tell you how many times I have watered things back from the brink and they seem no worse for the wear. This however does not go for the vegetable garden. Limited or irregular water can effect your harvest. Each time you water, be sure to water deeply. You want to make sure the roots are going down into the earth and not looking for water in the top two inches. That is the part that dries out the most rapidly. The best way to make sure you are watering long enough is to get out the shovel and check your soil moisture for several consecutive days after you water. A hand spade is really all you need to make sure you are getting a good 8-10 inches or more of soil penetration. Its good check you lawn in the same manner if you have doubts.
Monday, July 25, 2011
Are You Sharing in the Bounty?

I hope you are sharing the bounty of your crops! A client of mine did while I was in her yard last week. She even made it sound like I was doing her a favor by taking some cherries from her tree. Indeed I most likely did as I know the feeling of seeing that hard work rot on the tree. So remember, when you have eaten all the zucchini you can stand, or frozen and pitted all the cherries you care to eat, invite your friends over! There really is no reason for it to go to waste and what may currently be a burden to you is most likely a delight to the lucky recipient of your gift!
Sunday, July 17, 2011
Knee High by the Fourth of July

My father used to always say the the corn needed to be "Knee high by the the fourth of July". Who's knee do you think he was taking about? Things are definitely coming along out there in the garden. Several things didn't germinate this year. I think it had a lot to do with the cold weather. The ground just didn't seem to warm up quick enough! I missed all of the great early crops like radish, lettuce and spinach. I intend to try again this fall but I must say the salad bowl is very sadly empty!
Thursday, July 14, 2011
Youthful Favorites


Tuesday, June 28, 2011
Color

Well I am glad to be home but seem to have brought a cold with me. I am hoping it is just allergies....something in California I was not used to. I found lots of wonderful things in my garden when I got home. Amazing what a week of hot weather can do!
I seeded these California Poppies last summer. I have always liked them for their vibrant color, willingness to self seed and their need for little water. Needless to say I am really pleased to see how nice the color plays with the purple of the salvia. I would like to say I planned it that way but I did not. I am however pleased with the result and would recommend it for someone looking for something vibrant in the garden!
Monday, June 20, 2011
Mulch in the Vegetable Garden

In an effort to make my life easier and to reduce my water consumption, I am going to work really hard at mulching the the vegetable garden. My mulch of choice is going to be grass clippings. They are typically readily available and break down nicely adding organic matter to the soil. You can use green or dried. I happen to have some dried that were the result of someone power raking their lawn. After the plants are up, I will be weeding and then dressing with a thick layer of mulch. You will need to keep it pulled back from the plant stems and make sure you have a good source. I would recommend someone you can rely on to tell you if they have applied chemical to their lawn. If they have, you will need to skip on the clippings for three complete mowing cycles before you can utilize that source again.
Sunday, May 15, 2011
Garden Envy

Made a visit to the Denver Botanical Gardens this weekend. I must say that I now have garden envy. The weather has been so unstable the last three weeks that I have exactly nothing planted. Sigh. I have busied myself with transplanting and moving but have not actually planted anything into the garden. To say things are a bit behind is an understatement! There has been a little bit of method to the delay. Our garden seems to have been cursed with convolvulaceae! And no, it is not the desirable morning glory but its wicked sister bindweed! This is a particularly aggressive and hard to kill plant. As a result we have tilled and then allowed the plant to grow so that we can spray it. Yes, spray it. Generally I don't condone spraying in the garden but this is a competitor that cannot be beat by pulling! It has incredibly long roots! So we have sprayed three times....before doing ANY planting and tilled again. With any luck we are in the lead. Somehow, I doubt it. Any tips? I could use a few!
Friday, May 13, 2011
An Old Classic

If you ask me, gardening is for all the senses and nothing beats the smell of lilacs! They permeate the air like nothing else. No smell is more divine! My lilacs are most certainly a relic of the original farmstead. When the shrubs get too old, they can cease to bloom. Not to worry, all you need to do is cut them all the way down. I know it seems drastic but by the second year, your shrubs will be flush once again with that wonderfully aromatic smell.
Monday, May 9, 2011
How to Find Gold
I bet you didn't know it but your neighborhood is probably littered with gardeners gold! All you have to do is keep your eyes open and then be friendly enough to say HI! It will look like this:

In side these bags you can find one of the greatest compost materials and weed barrier products NOT on the market! I happened by a gentleman who was thatch raking and bagging in his front yard. I simply asked him if he had applied any chemical within the last three weeks and if I could haul away the bags for him! He was more than happy to let me have my share! Green bagged grass works well too. You just need to make sure that no chemical has been applied recently or that the lawn has been mowed three times since it was applied. I'm willing to bet that most of you have at least one neighbor that bags their clippings and would be more than willing to hand you the bags weekly. This weekend I used the grass to dress a garden bed after weeding.


In my opinion it looks better than anything you can buy and costs exactly a handshake! Use it around your garden rows and in your flower beds to keep the weeds down.

A 2-4 inch layer will go a long way keeping weeds at bay and moisture in the soil. Green grass clippings can be hot during decomposition so be sure not to pile to closely to tender vegetables. I also might suggest that you select a neighbor who's yard is pretty weed free so you are not introducing new problems. Be sure to recycle those trash bags too!

In side these bags you can find one of the greatest compost materials and weed barrier products NOT on the market! I happened by a gentleman who was thatch raking and bagging in his front yard. I simply asked him if he had applied any chemical within the last three weeks and if I could haul away the bags for him! He was more than happy to let me have my share! Green bagged grass works well too. You just need to make sure that no chemical has been applied recently or that the lawn has been mowed three times since it was applied. I'm willing to bet that most of you have at least one neighbor that bags their clippings and would be more than willing to hand you the bags weekly. This weekend I used the grass to dress a garden bed after weeding.


In my opinion it looks better than anything you can buy and costs exactly a handshake! Use it around your garden rows and in your flower beds to keep the weeds down.

A 2-4 inch layer will go a long way keeping weeds at bay and moisture in the soil. Green grass clippings can be hot during decomposition so be sure not to pile to closely to tender vegetables. I also might suggest that you select a neighbor who's yard is pretty weed free so you are not introducing new problems. Be sure to recycle those trash bags too!
Tuesday, April 26, 2011
Transplanting Seedlings

Hopefully you planted your seeds into a very loose medium that will make it easy to tease out the new roots on your seedlings. The longer you wait, the more roots and the harder it is to separate everything. I use straight pearlite for its ability to hold water and that it is easy to shake from new roots with minimal damage. Use something to scoop beneath the roots and lift the seedlings out.

Once you have shaken free the medium, you should have a little bit of green and some nice white roots. Try to break as few as possible. It helps to let the medium dry out a little bit before you try to tease them apart from one another.

Fill your pots level to the top. I like to use plant trays from last years purchases. For a purchased plant medium , I like Miracle Grow potting mix. It seems to be the best suited to start new seedlings. Make a hole in the soil with your finger. If the hole fills in before you put in your seedling, you are starting with a medium that is too dry. Gently nudge all of the roots into the hole and fill in. For peppers and tomatoes you can plant deep. Most everything else needs to be planted at the same depth it was originally growing. For the most part if you get roots down and green up, you will do fine.

Label everything! Each pot or six pack will require its own label if you intend to accurately know what you have later! Gently water in with a can. You will need to make sure that everything stays evenly moist but not too wet until a good root system is established. One dry day will kill these tiny plants!

With care, you should have something like this in two to three weeks! Happy Gardening!
Monday, April 25, 2011
Pink Profusion

Most of my fruit trees are currently in full bloom. This crabapple is by far my favorite. It is one of the few original plants we were able to keep. Nothing makes me happier than looking out the back door and seeing this tree in all of its splendor!

These are apple blossoms. I hope this all means I am destined to have a fruit filled summer!
I would feel more comfortable about that prediction if I was finding a few more bees too. How are your fruit trees doing? Have you seen a lot of bees? I hope it has not been too cool for them!
Monday, April 18, 2011
Arbor Day
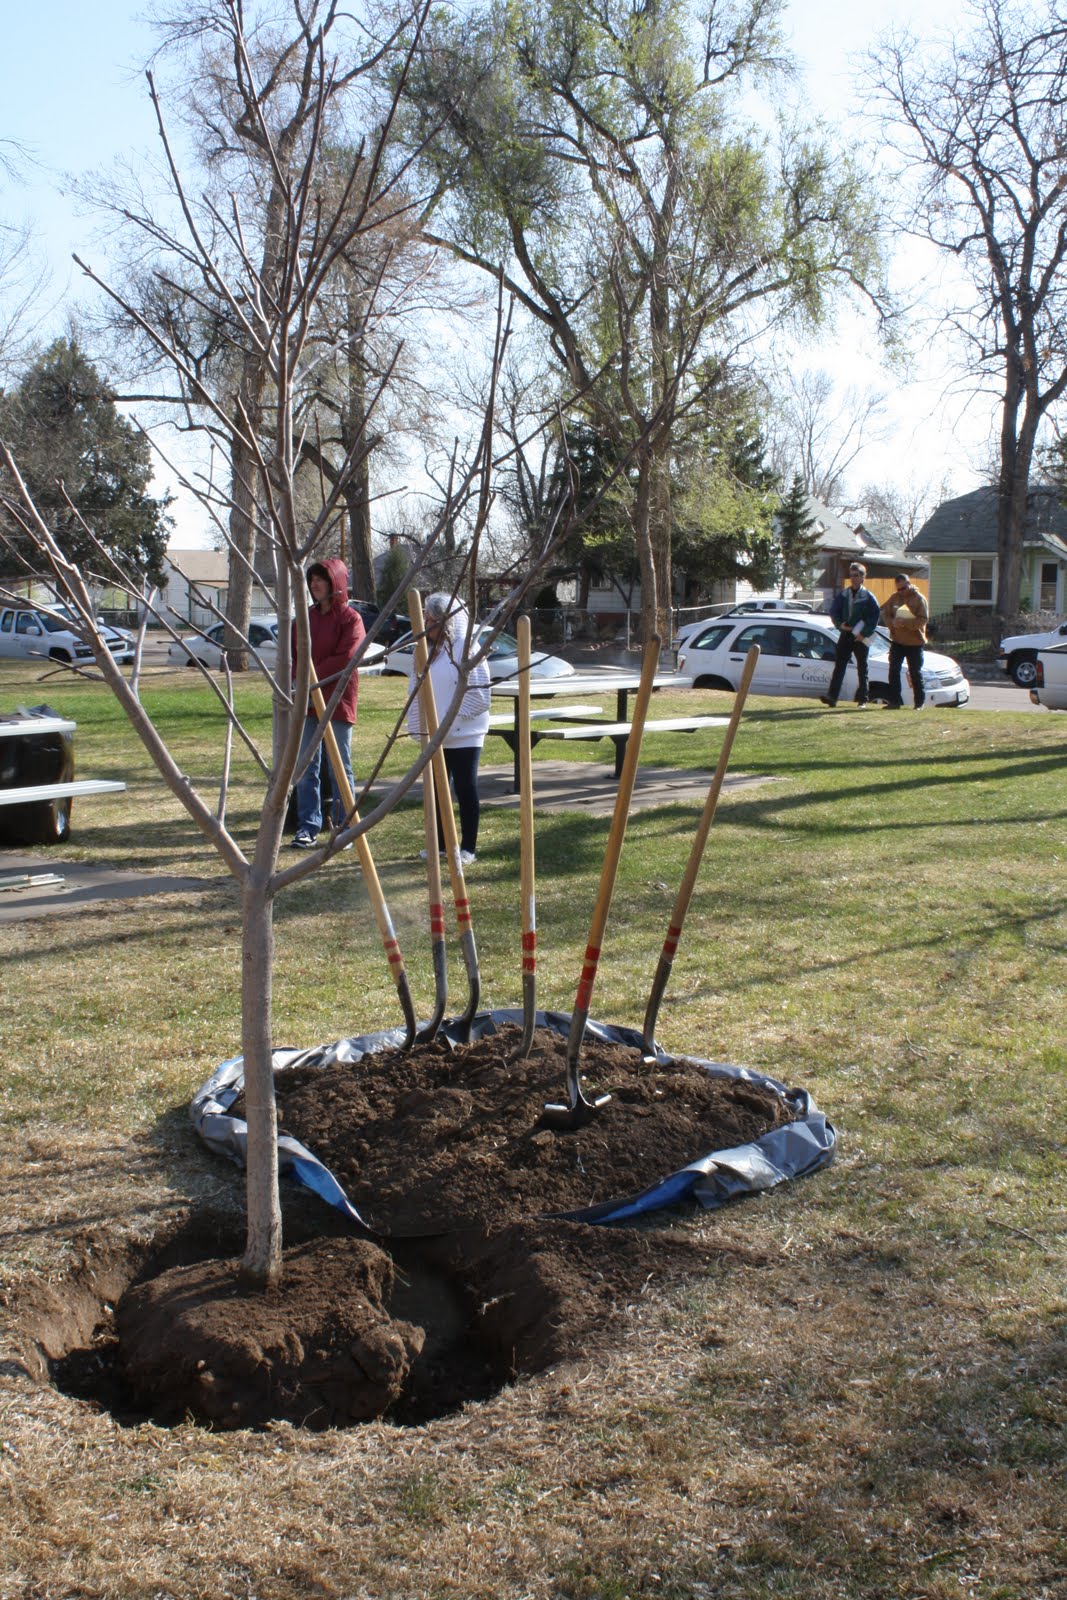
I hope you attended Arbor Day this year-or at least plan to plant a tree! Spring is an excellent time to plant your trees and shrubs. Not with standing that yesterday was the best time to plant that tree so don't delay. You local Master Gardener or county extension office can help you make a selection if you are not sure what to choose. I attended the City of Greeley's festivities. This fine tree was planted in Sunrise park:

I ate my share of cookies and then took my free seedling Austrian Pine home. It will be potted and nursed along with last years blue spruce. I also helped out this year by reading the Giving Tree to several local first graders. They were beyond excited to get their "first grade" trees at the end of the presentation. It was a great experience.
If you do put in a new tree this spring, be sure to make a nice water well at the bottom for deep watering. The forestry staff did a nice job on this one:

I wish you a long life little buckeye tree!
Monday, April 11, 2011
Compost
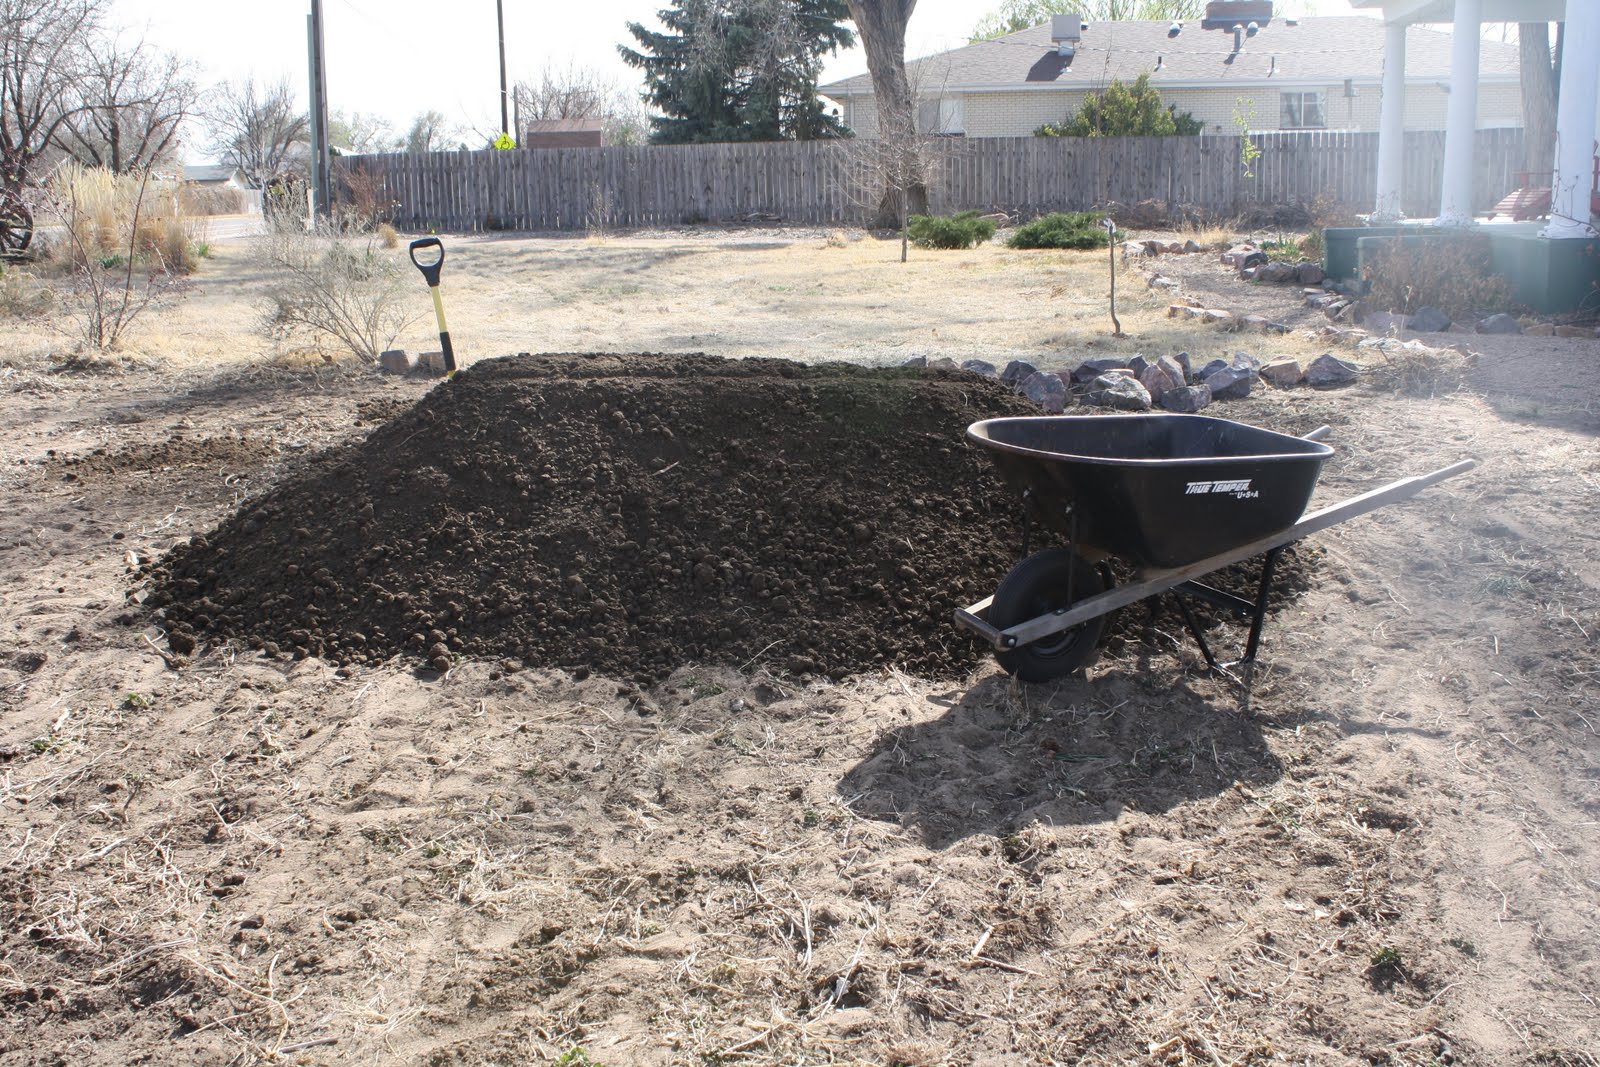
To begin this garden season we decided it would be best to jump start our soil improvements by ordering four cubic yards of compost. We have a sandy loam soil that lets the water run straight through. By continually adding soil improvements, I hope to increase its water holding capacity and provide natural nutrients for the plants. Since I cannot possibly make enough compost to feed my whole garden, I had to purchase. There are a few things you need to know when purchasing compost. First is to figure out the amount you will need. In general, about 4 cubic yards per 1,000 square feet is good for just about any application. You can add more, but this depends on the product. The picture above, is a four cubic yard pile of compost. It took two of us about 2 hours to spread by hand so don't be intimidated. When you purchase compost it can come from varying sources. You will need to ask. You can buy a manure based product or a yard waste based product. The safest way to go is to buy a yard waste product. This product does not run the risk of being hot and burning your plants if you over apply. It should be dark in color, show no signs of its parent product and smell like rich dirt. A well composted manure product can also be very useful. It should not smell like manure if it has been composted completely and will generally cost more than a product that still needs to break down some more. If it smells like manure be cautious! Not to say this isn't a good product, you just need to be more careful in your usage of it. It will need to be tilled or spade in well and not over applied or it will burn your plants.


Monday, April 4, 2011
Cold Frame
I've had an old storm door stored in my garage for at least five years now with the intention of building a cold frame. Well, I think it is finally time. I have the door, and thanks to a deck removal, a large supply of scrap wood. The benefit of a cold frame is that you can get a jump on the growing season. I know, I have a heated greenhouse but there is never enough space! A cold frame also has the benefit of being a passive system that shouldn't cost anything to operate!
 Free lumber is always good! I have lots of plans for this pile of wood. At least that is what I keep telling code enforcement!
 Designing the angled sides is the most difficult part. Be sure your angled edge is not wider than the width of your door. Some of these cuts were a bit tough with a circular saw. It would have been nice to have some more equipment. But as you see here I got it done.
 I made the legs to extend one foot into the ground. This helps to support the weight of the door. Mine is really heavy. It might be wise to go with something lighter if you have a choice.
 Once the angled pieces are complete, you can assemble the rest in the field. I used lag screws to attach the boards. Once again, make sure this assembled measurement does not exceed the total length of your door.
 Base complete. Be sure to angle your frame to the south for the best sun exposure. The intent is to capture as much sun as possible during the day.
 I attached the door with door hinges. It still needs and additional board and some sealing to efficiently hold heat but for the most part, it is done. I will put some new top soil and compost inside and will definitely use it to harden off plants this spring. I had hoped to use it a bit more this spring but as my husband reminded me, its done. Its ready for fall use and is no longer taking up space in the garage! The cost to build can be summed in the total cost of the lag screws(about .35ea). The rest was recycled. Let me know if you have questions.


Saturday, April 2, 2011
Plant Profile: Pasque Flower

If you are not familiar with this spring flower you should be! Pasque flower is an unexpected spring wonder. It is also known by prairie crocus, wind flower, Easter flower and meadow anemone. What ever you choose to call it the large, bold flowers are beautiful. Fuzzy buds show almost before the leaves! The petals catch the sun making it a great choice next to the front door or close to the edge of a path where its early show can be appreciated. I have seen it in shades of red, purple and pink.

The entire plant only reaches about 12" tall. After blooming its lacy, mounding foliage and fuzzy fruits contribute to the flower bed well into summer. Be cautious, this one can be very poisonous to humans!
Wednesday, March 30, 2011
Seed Starting

I start many of my own seedlings in the greenhouse. You don't actually need a greenhouse to do so, just a place with a lot of light. I like to get them started in a tray of perlite. It holds moisture well and separates easily when it comes time to pluck out the seedlings and plant them into soil. Here you see sprouted cabbage, brussel sprouts and broccoli. At this size they are ready to be transplanted into soil. In this tray I also have my tomatoes and peppers but they have not sprouted yet! I'll post some images of the transplanting process soon! I am so happy to be busy with the workings of spring! Be sure you are getting your seeds going too!
Subscribe to:
Posts (Atom)