Sunday, April 7, 2013

Irrigation Installation: Phase I Backflow Preventer


After ten years of hose dragging I am ready to join the followers of automated irrigation.  The realization that this half acre property is not going to make the next step to curb side oasis without it is a reality and a battle I am ready to give up.  I am tired of spending every evening pulling hoses and setting the oven timer trying to stay on top the needs of my yard.  I want to play with my 5 year old and go camping without the worry that the yard will be crispy when I get back.  The first step in that process is the installation of a backflow preventer.
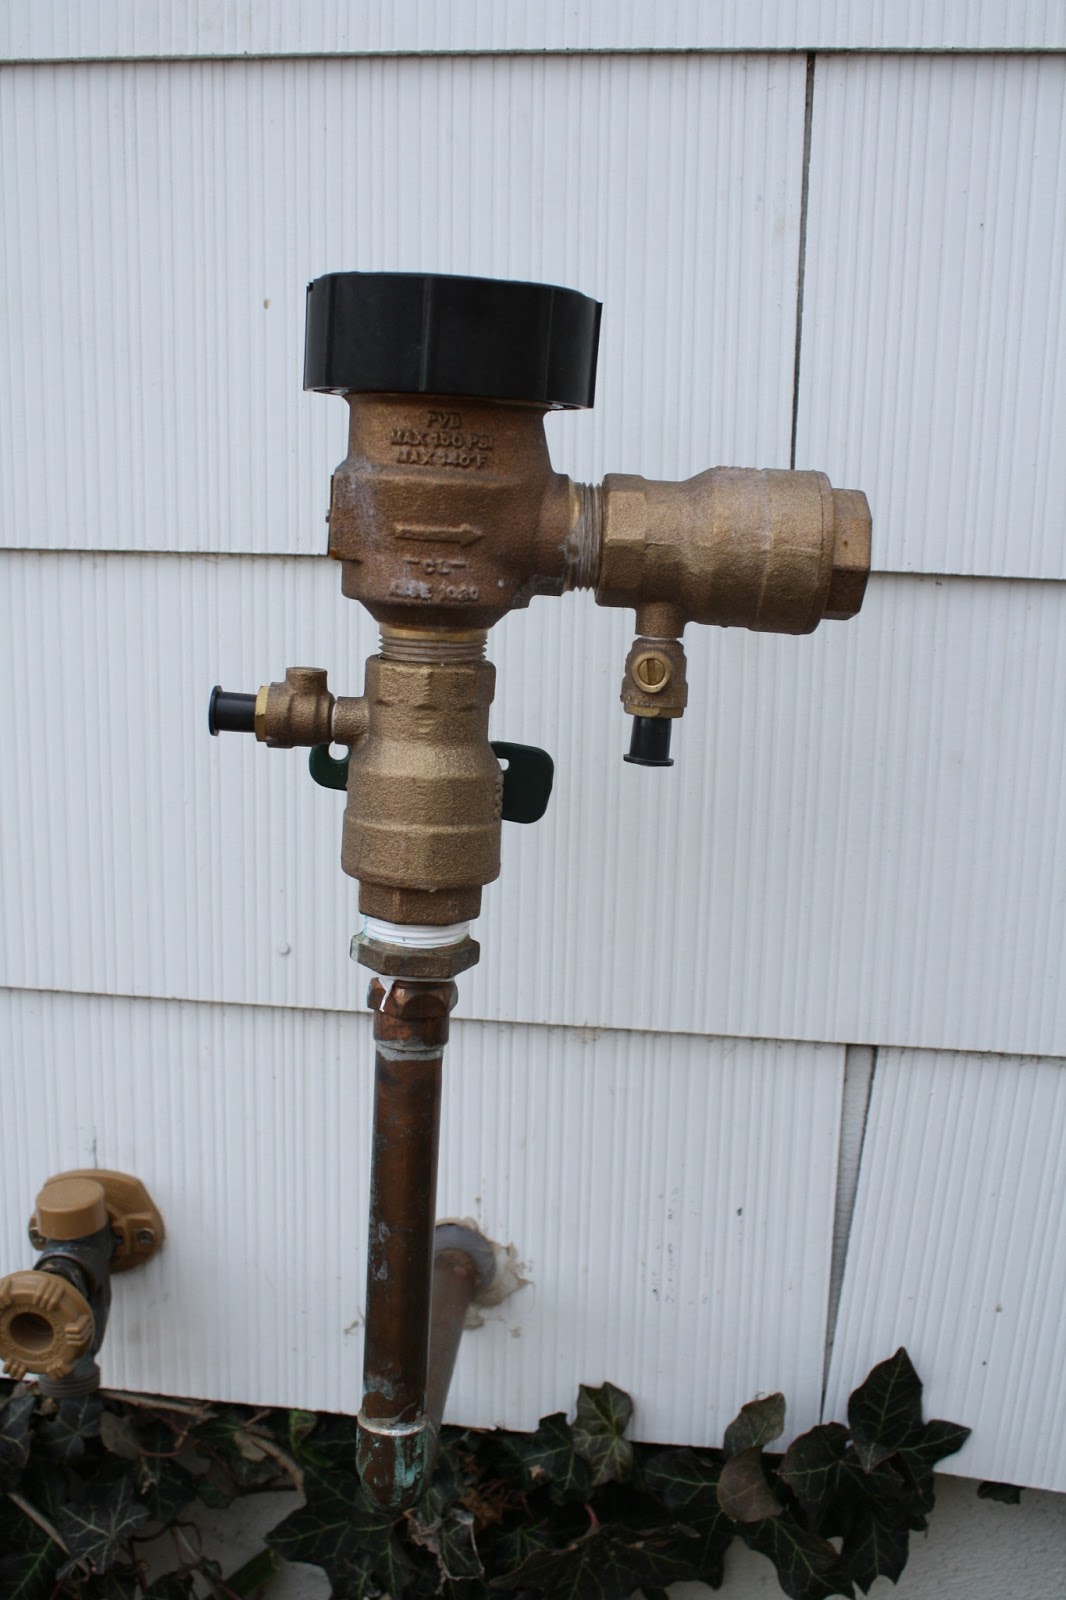
In an effort to spread out the costs of the system installation I had mine installed in the fall of last year.  This part of the project must be installed by a licensed plumber.  Its purpose is primarily to prevent the backflow of stagnant or potentially contaminated water from your irrigation system into your household.  The cost was roughly $350.00.

I have a basement so this shut off valve and drain is installed inside in the basement allowing it to gravity drain.  In the fall the valve is turned to the off position as shown and the spigot is opened to allow water to drain out of the outside portion.  This prevents freezing and damage to the back flow in winter.  

The next step in this process will be the installation of the system in the yard.  I am just about giddy with excitement!

Saturday, March 30, 2013

Free Motion Fun

I am still experimenting with some of the designs from Free Motion Quilting with Angela Walters.  This baby quilt is pieced of my own design.  Instead of one consistent stitch across the whole quilt I broke it up with some different techniques.
I am still in love with the organic nature of free motion quilting.  I am not  a stay with in the lines kind of gal and don't feel like my stitching needs to be.  I don't mind that the spacing is inconsistent. I am still new at this but have to say I much prefer the inconsistency to rigid spacing.

The best part is that it is fun and fast!  Baby blankets are a great place to experiment and try new things.  They are a short term commitments and you give it away so if you hate it, you don't have to look at it for long!


Saturday, March 23, 2013

Get It Done

Lately I have been in a get it done mood.  I feel a feverish need to finish some of those projects that have been sitting around for well, a long time.  I have one that is three years old.   The very sad part is that it was a gift that is now three years late!  Yikes!  I did however have to slip in a baby shower gift.  I found some fun fabric on a recent visit to California that seemed just perfect.  I did not piece this quilt as I wanted to focus on some actual quilting techniques.  The pattern I used comes from Free Motion Quilting with Angela Walters.  This is a great book. I highly recommend it if you are giving free motion quilting a try.  She does a great job of walking you through how to make the patterns.  I recommend sketching the patterns as suggested its worth the time!


My patterns always turn out a bit more organic than those presented in the book.  Bu,t I like them.  They are all mine!  Don't you just love those vintage looking princesses riding a dragon?  This is the stuff of my fairy tale!

Tuesday, October 9, 2012

Creative Space

Recently we added this huge chalk board to our wall.  I imagined it as a grand family organization center.  It does do a bit of that but only clear at the top where little arms can't reach!  Up there you will find my cleaning schedule.  The person that loves it most is my daughter.  This is a kid that spends 85% of her free time creating something so it is optimal for her.  A bucket nearby holds all the chalk and something to erase with.  I purchased a 4x8 sheet of fiber board and used the recipe at the bottom to create my own chalk paint.  All told, it was probably a $15.00 project.  I had the board cut to 4x6 at the store so that I could get it in my sedan without too much hanging out the back.  Now to find some old yard sticks to frame it with!

DIY CHALK BOARD PAINT:
2 Tablespoon non-sanded ground
1/2 cup paint

I used my hand mixer to mix it all together.  I would recommend, mix, set, mix, set and mix again if you feel the need.  The setting seems to help get some of the lumps out.

Tuesday, October 2, 2012

Something to Inspire

Some more from my last visit to Nebraska.  I am always enchanted by the eclectic garden.  The one that looks sculpted by hand and not a professional gardener.  One where you are likely to find a dirt covered dweller thinking up some new way to arrange the wine bottles....

place the plate shards in concrete, or discovering new ways to use an old toilet.  It is typically a place that is overgrown,

with lots of texture and where the common looks uncommon.

Wednesday, September 26, 2012

Garlic

During my fathers visit this fall he brought me several garlic heads that he grew in his own garden in Texas.  I have never grown garlic before so there is no better time than the present!  Fall is the time to plant so I selected the largest bulbs and planted a dozen or so.  As a general rule, seeds and bulbs are planted at a depth that equals their height.  So for these, about 1.5 inches.  These are large bulbs with a mild flavor.  It will be fun to see how they do next fall.  I plan to mulch them in with some leaves to protect them.  Hopefully they are not too soft given that they came from Texas!

Monday, August 27, 2012

Rocky Mountain Quilt Festival Highlights

Had the opportunity to see some spectacular things at the Rocky Mountain Quilt Festival this year.  I love the purple peach combo of the quilt above.  These are colors I would have never thought to put together.  These first three images I am sharing with you are from the Irena Bluhm quilt exhibit. The stitch work shows a lot of detail and is what makes these quite extraordinary.

Sorry for the poor photos.  I was once again out and about without my camera!

I enjoyed the look of the half circles below.  The circles appeared to be appliqued. I liked the simple design and think the technique might work great with pennants too.

The next two photos are from the booth of Michelle Crawford of Flower Box Quilts.  My sister and I took a class from her in the morning.  The class description read like this "What do you do with all your scraps? Become a frugal and "green" quilter by recycling your scraps! Learn Michele's formula, The More the Merrier for creating scrap quilts. Learn how to use color value in creating contrast, depth and movement in your scrap quilts. Lecture includes PowerPoint presentation and trunk show."   I was thinking great I have have a lot of scraps and could use some information on color theory.  Well my friends, I paid $20.00 and spent 2 hours to look at photos of other peoples quilts and listen to her promote her books for 1.5 hours.  The actual content of the lecture was a scant 20 minutes.

I was disappointed to say the least.  Imagine my surprise when I snapped these photos in the booth and was promptly lectured that she does not allow photos!  I did not see a sign in any of the other booths limiting photos and low and behold if you hit her website you will find this block layout on the front of Quilter Magazine.  

She has a great idea for making over sized blocks from scraps and then cutting them up and resewing them but it didn't require 2 hours of lecture time.  I wish I'd spent my $20 on fabric.  Sigh.  You win some and you loose some.

This little owl rocked my world!  I am truly amazed as some of the ART pieces that show up at the quilt fairs.  I do not have 1/10th the patience of most of these people but I appreciate their efforts.  I would just love to have this guy watching over me at night!

These last two photos are from the Route 66 exhibit.  Its a 60 ft long fabric map dipicting the historic highway with small "picture" quilts from around the country.