Monday, April 11, 2011
Compost
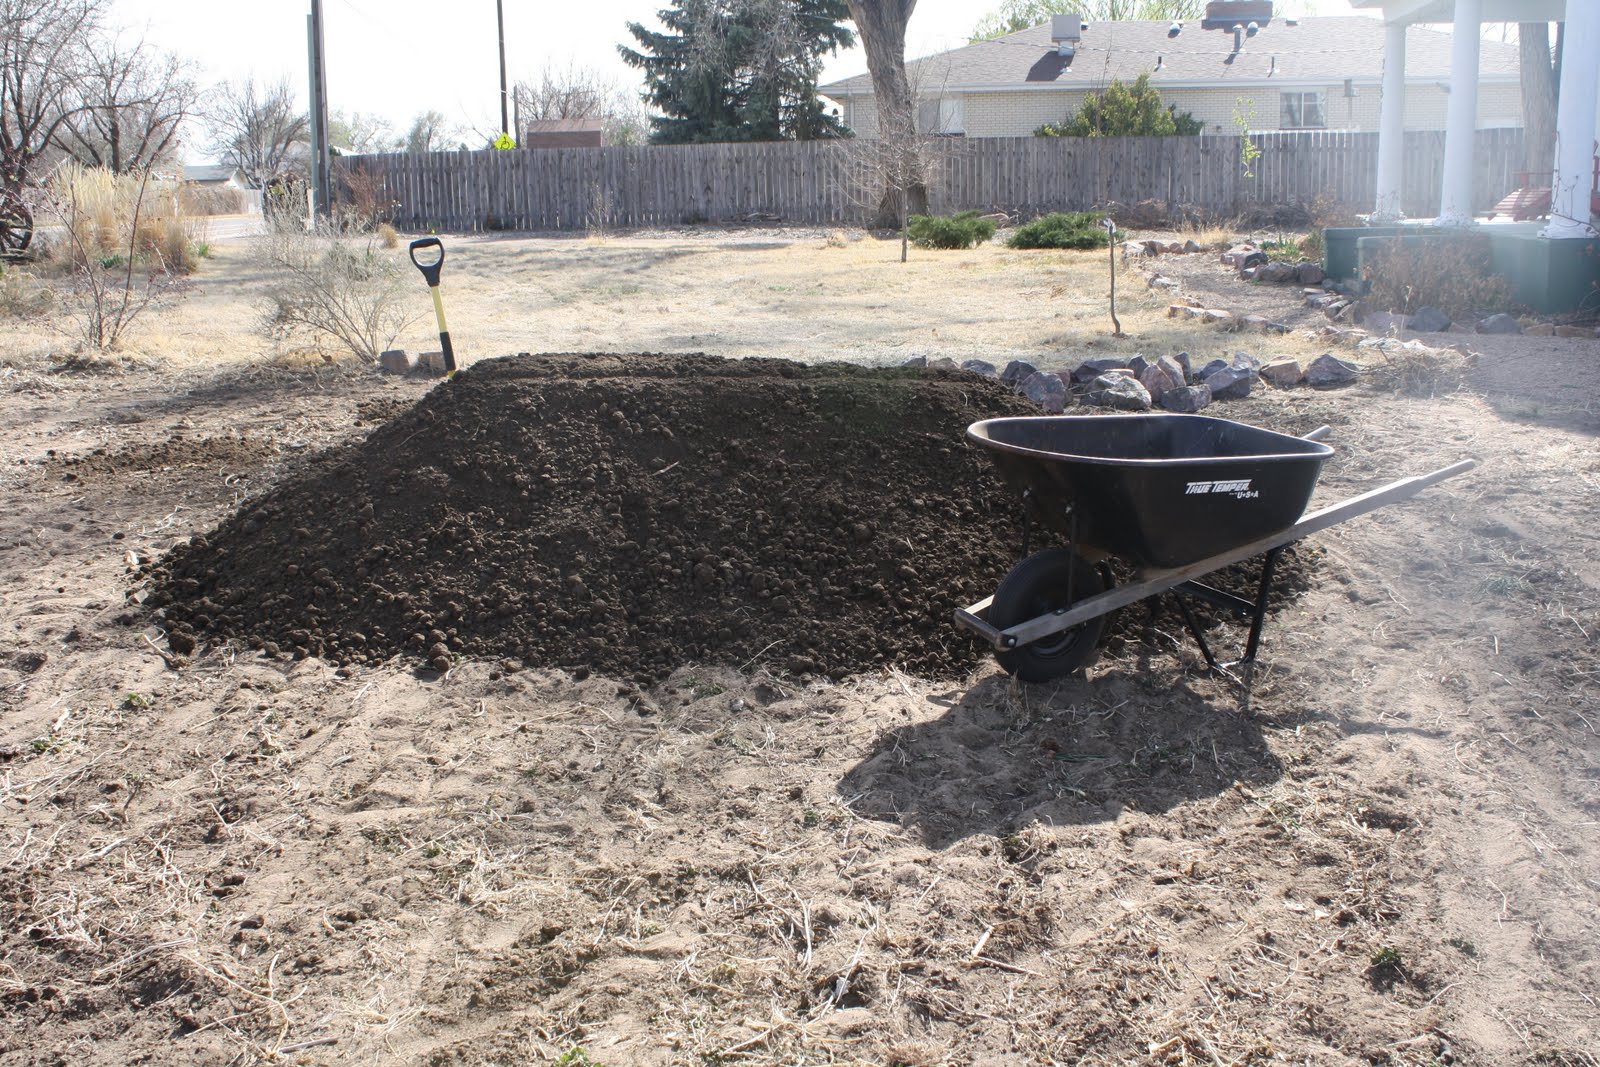
To begin this garden season we decided it would be best to jump start our soil improvements by ordering four cubic yards of compost. We have a sandy loam soil that lets the water run straight through. By continually adding soil improvements, I hope to increase its water holding capacity and provide natural nutrients for the plants. Since I cannot possibly make enough compost to feed my whole garden, I had to purchase. There are a few things you need to know when purchasing compost. First is to figure out the amount you will need. In general, about 4 cubic yards per 1,000 square feet is good for just about any application. You can add more, but this depends on the product. The picture above, is a four cubic yard pile of compost. It took two of us about 2 hours to spread by hand so don't be intimidated. When you purchase compost it can come from varying sources. You will need to ask. You can buy a manure based product or a yard waste based product. The safest way to go is to buy a yard waste product. This product does not run the risk of being hot and burning your plants if you over apply. It should be dark in color, show no signs of its parent product and smell like rich dirt. A well composted manure product can also be very useful. It should not smell like manure if it has been composted completely and will generally cost more than a product that still needs to break down some more. If it smells like manure be cautious! Not to say this isn't a good product, you just need to be more careful in your usage of it. It will need to be tilled or spade in well and not over applied or it will burn your plants.
Spread the compost evenly over the surface of your area. If you need to till it in you can use a spade, rototiller or wheel hoe. Yearly applications of compost along with tilling in leaves goes a long way to improving your soil the natural way. We went with a manure product this year that needed tilled. Let me tell you, it was a bit stinky! I hope the neighbors don't notice!
This is my garden. Tilled and ready to plant! Happy Gardening!
Friday, April 8, 2011
Being Neighborly
About three weeks ago I drove in the driveway to find the neighbors cat. Dead. Now being the farm girl that I am, I decided the best course of action was to take said cat back to its owners. All of a sudden I find myself standing on the porch of the neighbors I have not met, daughter in one hand, dead cat in the other. I was certain that was not the way to greet the the neighbor that 1) moved in 6 months ago and I failed to introduce myself too and 2) who wants to see someone at their front door holding a dead cat? So, I gently placed the cat that I had wrapped in a towel around the side of the door and rang the bell. It was a most awkward moment. A few days later they dropped off a shamrock to say thanks but I still felt guilty about not saying "Hi" properly. I have found urban living to not be all that neighborly and only but the boldest of urban dwellers will extend themselves to you. I talk regularly with exactly one neighbor. That is a sad state of affairs.
As a result, I put together a welcome bucket for the new peeps on the block. Some wash rags, handmade cards, cookies, pencils, decorated note pads, tea and a onsie for their new baby. Just a few things to say hello, I'm a nice person. Make sure to extend yourself to someone this week. It might just make their day.
Wednesday, April 6, 2011
Are you getting any feathers?
Its been few weeks so your baby chicks should have put on a good amount of feathers. Be sure you are raising the heat lamp a few inches weekly. This not only encourages them to put on their feathers but makes sure they are being acclimated gradually to life with out a lamp! I don't know about you, but I don't have a heated hen house so they have to live the guest bedroom for now! Watch your chicks closely to make sure they are not huddling and indicating that perhaps you have moved it a bit too high.
Monday, April 4, 2011
Cold Frame
I've had an old storm door stored in my garage for at least five years now with the intention of building a cold frame. Well, I think it is finally time. I have the door, and thanks to a deck removal, a large supply of scrap wood. The benefit of a cold frame is that you can get a jump on the growing season. I know, I have a heated greenhouse but there is never enough space! A cold frame also has the benefit of being a passive system that shouldn't cost anything to operate!
Free lumber is always good! I have lots of plans for this pile of wood. At least that is what I keep telling code enforcement!
Designing the angled sides is the most difficult part. Be sure your angled edge is not wider than the width of your door. Some of these cuts were a bit tough with a circular saw. It would have been nice to have some more equipment. But as you see here I got it done.
I made the legs to extend one foot into the ground. This helps to support the weight of the door. Mine is really heavy. It might be wise to go with something lighter if you have a choice.Once the angled pieces are complete, you can assemble the rest in the field. I used lag screws to attach the boards. Once again, make sure this assembled measurement does not exceed the total length of your door.Base complete. Be sure to angle your frame to the south for the best sun exposure. The intent is to capture as much sun as possible during the day.
I attached the door with door hinges. It still needs and additional board and some sealing to efficiently hold heat but for the most part, it is done. I will put some new top soil and compost inside and will definitely use it to harden off plants this spring. I had hoped to use it a bit more this spring but as my husband reminded me, its done. Its ready for fall use and is no longer taking up space in the garage! The cost to build can be summed in the total cost of the lag screws(about .35ea). The rest was recycled. Let me know if you have questions.
Saturday, April 2, 2011
Plant Profile: Pasque Flower
If you are not familiar with this spring flower you should be! Pasque flower is an unexpected spring wonder. It is also known by prairie crocus, wind flower, Easter flower and meadow anemone. What ever you choose to call it the large, bold flowers are beautiful. Fuzzy buds show almost before the leaves! The petals catch the sun making it a great choice next to the front door or close to the edge of a path where its early show can be appreciated. I have seen it in shades of red, purple and pink.
The entire plant only reaches about 12" tall. After blooming its lacy, mounding foliage and fuzzy fruits contribute to the flower bed well into summer. Be cautious, this one can be very poisonous to humans!
Wednesday, March 30, 2011
Seed Starting
I start many of my own seedlings in the greenhouse. You don't actually need a greenhouse to do so, just a place with a lot of light. I like to get them started in a tray of perlite. It holds moisture well and separates easily when it comes time to pluck out the seedlings and plant them into soil. Here you see sprouted cabbage, brussel sprouts and broccoli. At this size they are ready to be transplanted into soil. In this tray I also have my tomatoes and peppers but they have not sprouted yet! I'll post some images of the transplanting process soon! I am so happy to be busy with the workings of spring! Be sure you are getting your seeds going too!
Monday, March 28, 2011
Babies Babies Babies!
I have no fewer than 5 baby quilts to crank out before June this year! That's madness! It would help if some people wouldn't crank out two at a time! Making baby quilts are one of my favorite gifts to give and make. It's quick and I can try all kinds of new patterns and skills! These two were shipped to California! This is the first time I worked with a panel. I do have to say it was sinfully quick and easy and had beautiful results! My daughter is three and I now keep her baby quilts in the car. They make perfect lap quilts for those cold mornings in the car!
This one is a bit more traditional but I love the bright colors! I trend away from pastels for babies. I think they need something bright, vibrant and fun!
Subscribe to:
Posts (Atom)